banner


How To Remove Cabin Filter In Acura Tsx

Introduction

Recommendations are to replace the motel air filter every yr, or every x,000 miles, whichever comes earlier. Depending upon your locale, you may wish to replace it after pollen flavour, or more frequently. When yous run into how easy this procedure is, you won't want to postpone this. Some dealers charge upward to $threescore for this service, which takes an experienced tech barely x minutes. That'southward a remarkable profit.

The OEM filter is made by micronAir, either overseas or in the Usa. (Note: the 2006 Honda Accord air mixer/blower uses the very same filter, so you lot tin purchase one at a Honda dealer versus an Acura dealer. You may find a drastic difference in price.) Is there a divergence? None that I can tell. Fram, Bosch, Purolater, and others make suitable aftermarket filters. Is there a deviation? Some minor differences, merely this is a consumable, or a role that is regularly replaced for dirt buildup, so change it as oft as you like.

  1. Open the glove box and empty it of all contents. The next step is critical. If you remove the stopper arms and pull down the glove box with the damper assy arm still attached, you'll break it. Replacing it involves removing a large part of the dashboard, a major job. You don't want to do this, trust us on that.

    • Open the glove box and empty it of all contents.

    • The next step is critical. If you remove the stopper arms and pull down the glove box with the damper assy arm withal attached, you'll pause information technology. Replacing it involves removing a large function of the dashboard, a major job. You don't want to practise this, trust usa on that.

    • Release the glove box damper assy arm on the right side of the glovebox by pushing gently forrard towards the engine. The "C" latch volition release from a pivot, and the end of the arm volition lift out of the opening.

    • The damper assy will not disappear into the dashboard, so there'due south no demand to hang on to it. Merely push it up a petty and out of the way.

  2. On the Honda Accord and other models, the glove box incorporates stops in the box drawer itself. Not the TSX! The glove box has two stops, left and right side, that must be removed. Open the glove box and then close it about an inch. You'll start with the right side glove box stopper arm because it's easier to see what you're doing.

    • On the Honda Accordance and other models, the glove box incorporates stops in the box drawer itself. Non the TSX! The glove box has two stops, left and correct side, that must be removed.

    • Open up the glove box and then close it nigh an inch.

    • You'll beginning with the correct side glove box stopper arm considering information technology's easier to see what you're doing.

    • Reach into the upper right side and likewise experience on the outer right side of the glove box. When you experience a flat flange on the interior of the box, you've identified the glove box stopper arm (p/n 77508-sx0-000).

    • From the outside of the box, gently push button in on the flange. As you lot can see from the illustration, there are little tabs that hold information technology in. Slowly push the flange into the box to unsnap it.

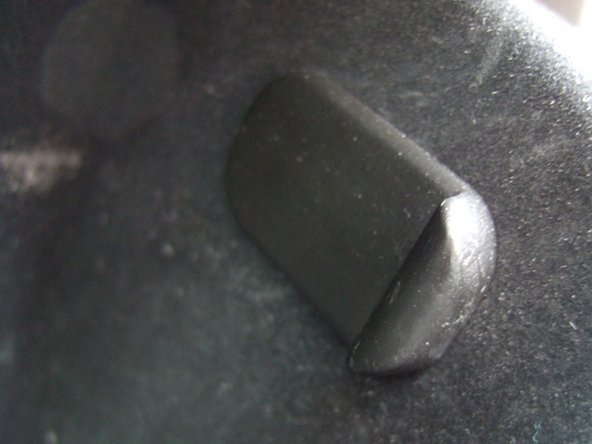
    • With the stopper arm now loose, shut the box a footling farther, and simultaneously pull the terminate down in the hole, then pivot into the box. The rubber stopper (p/northward 66417-sa0-000) will slide through the hole and the unabridged stopper arm comes gratis into the glove box interior.

    • Repeat for the corresponding stopper arm on the left side.

  3. Gently, very gently, lower the glove box. There is a nylon cord that will support the glove box in a lowered position. If that cord isn't present, lower the glove box onto your knee(s).

    • Gently, very gently, lower the glove box. In that location is a nylon cord that volition support the glove box in a lowered position. If that cord isn't nowadays, lower the glove box onto your knee(s).

    • By the mount for the nylon cord is the Trunk Main Switch. In the OFF position, this disables opening the trunk from the body lid switch by the license plate, and the remote transmitter (key fob) button.

    • With the unabridged glove box exposed, now is a convenient time to clean it out with a soft brush or damp microfiber fabric. A sheet torn off a pet hair roller does a good job of picking up devious dust and fibers.

    • If the glove box courtesy light is burnt out, y'all can observe the bulb holder above the glove box opening to the correct of the center. That's some other guide....

  4. With the glove box now lowered, the heater blower unit is visible. At the top of the blower is the air filter tray. The air filter tray is held in by two locking tabs on the front left and front right. Reach in and press these tabs in towards the center. Gently slide out the tray. Use care not to snag on the nylon support cord or surrounding wiring.

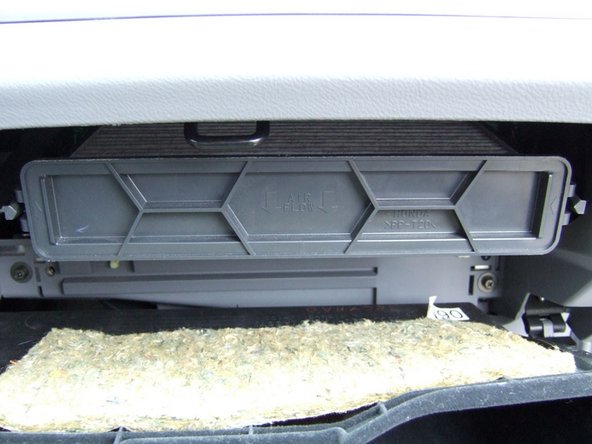
    • With the glove box now lowered, the heater blower unit of measurement is visible. At the top of the blower is the air filter tray.

    • The air filter tray is held in by two locking tabs on the forepart left and forepart right. Reach in and press these tabs in towards the center.

    • Gently slide out the tray. Use intendance not to snag on the nylon back up cord or surrounding wiring.

  5. With the tray removed, take out the old filter. You may wish to vacuum or brush out the filter tray with a soft interior detailing brush. Note the intended air flow through the filter. The air flow in the heater blower is from top to bottom (down). The tray should have an indicating mark.

    • With the tray removed, take out the one-time filter.

    • You may wish to vacuum or brush out the filter tray with a soft interior detailing brush.

    • Annotation the intended air flow through the filter. The air menstruum in the heater blower is from top to lesser (downwards). The tray should have an indicating mark.

    • Insert the new filter into the tray. The rigid sides of the filter (with printing) go to the left and correct side of the tray.

    • When inserting the new filter, note the retaining tabs inside the tray that the concluding vanes of the filter fit into, on both ends. This ensures that the filter has a near-airtight seal in the tray.

    • Ensure the filter is fully inserted into the tray, or the tray won't fit back into the blower.

  6. Slide the filter tray back into the heater blower the same way it was removed. The left and right  locking tabs should snap into place when it's fully inserted.

    • Slide the filter tray back into the heater blower the same fashion it was removed. The left and right locking tabs should snap into place when information technology's fully inserted.

  7. Reinstall the left and right glove box stopper arms just as they were removed. Close the glove box so that when the stops are reinserted into the holes, the rubber stops are above  the dashboard fascia. Slide the stops upwards in the holes so that the tabs on the flanges snap into the glove box holes. The flanges of the stopper arms should rest flat against the inside wall of the glove box. If they do not rest flat, you have not slid the stops up all the way in the holes. The flanges of the stopper arms should rest flat against the inside wall of the glove box. If they do not rest flat, you have not slid the stops up all the way in the holes.

    • Reinstall the left and right glove box stopper arms merely every bit they were removed. Close the glove box so that when the stops are reinserted into the holes, the condom stops are above the dashboard fascia. Slide the stops upwards in the holes so that the tabs on the flanges snap into the glove box holes.

    • The flanges of the stopper artillery should rest flat against the inside wall of the glove box. If they do non rest flat, you have not slid the stops upwards all the style in the holes.

  8. Lift the glove box closed and slowly pull the pneumatic arm down to the notch in the glove box door. Don't pull it faster than it wants to descend! From the rear of the notch in the glove box(towards the engine), snap the "C" clasp back on to the pin in the notch. Put your belongings back into glove box and close. You're done! Put your belongings back into glove box and close. You're done!

    • Lift the glove box closed and slowly pull the pneumatic arm down to the notch in the glove box door. Don't pull it faster than it wants to descend! From the rear of the notch in the glove box(towards the engine), snap the "C" squeeze back on to the pin in the notch.

    • Put your belongings back into glove box and close. Yous're done!

Embed this guide

Choose a size and copy the code below to embed this guide as a minor widget on your site / forum.

Preview

How To Remove Cabin Filter In Acura Tsx,

Source: https://www.ifixit.com/Guide/2004+2005+2006+2007+2008+Acura+TSX+%28CL9%29+Cabin+air++filter+Replacement/60239

Posted by: goodwinengifiricent.blogspot.com

0 Response to "How To Remove Cabin Filter In Acura Tsx"

Post a Comment

Iklan Atas Artikel

Iklan Tengah Artikel 1

Iklan Tengah Artikel 2

Iklan Bawah Artikel