

What Design Patterns Are Commonly Used In Ios Apps
Update note: This tutorial was updated for iOS 11, Xcode 9 and Swift 4 by Lorenzo Boaro. Original post by Tutorial team member Eli Ganem.
iOS Design Patterns – you've probably heard the term, but do you know what it means? While most developers probably agree that design patterns are very important, there aren't many articles on the subject and we developers sometimes don't pay too much attention to design patterns while writing code.
Design patterns are reusable solutions to common problems in software design. They're templates designed to help you write code that's easy to understand and reuse. They also help you create loosely coupled code so that you can change or replace components in your code without too much hassle.
If you're new to design patterns, then I have good news for you! First, you're already using tons of iOS design patterns thanks to the way Cocoa is built and the best practices you're encouraged to use. Second, this tutorial will bring you up to speed on all the major (and not so major) iOS design patterns that are commonly used in Cocoa.
In this two-part tutorial, you will create a music library app that will display your albums and their relevant information.
In the process of developing this app, you'll become acquainted with the most common Cocoa design patterns:
- Creational: Singleton.
- Structural: MVC, Decorator, Adapter, Facade.
- Behavioral: Observer, and, Memento
Don't be misled into thinking that this is an article about theory; you'll get to use most of these design patterns in your music app. Your app will look like this by the end of the tutorial:

Let's get started!
Getting Started
Download the Starter project, extract the contents of the ZIP file, and open RWBlueLibrary.xcodeproj in Xcode.
Note the following things in the project:
- The
ViewControllerhas threeIBOutletconnecting the table view, the undo bar button item and the trash in storyboard. - The storyboard has 3 components which are setup with constraints for your convenience. The top component is where the album covers will be displayed. Below the album covers will be a table view which lists information related to an album cover. Lastly the tool bar has two buttons, one to undo an action and another to delete an album that you select. The storyboard is shown below:

- A starter HTTP Client class (
HTTPClient) with an empty implementation for you to fill in later.
Note: Did you know that as soon as you create a new Xcode project your code is already filled with design patterns? Model-View-Controller, Delegate, Protocol, Singleton – You get them all for free! :]
MVC – The King of Design Patterns

Model-View-Controller (MVC) is one of the building blocks of Cocoa and is undoubtedly the most-used design pattern of all. It classifies objects according to their general role in your application and encourages clean separation of code based on role.
The three roles are:
- Model: The objects that hold your application data and define how to manipulate it. For example, in your application the Model is the
Albumstruct, which you can find in Album.swift. Most applications will have more than one type as part of their Model :] - View: The objects that are in charge of the visual representation of the Model and the controls the user can interact with; basically, all the
UIView-derived objects. In your application the View is represented byAlbumView, which you can find in AlbumView.swift. - Controller: The controller is the mediator that coordinates all the work. It accesses the data from the model and displays it with the views, listens to events and manipulates the data as necessary. Can you guess which class is your controller? That's right:
ViewController.
A good implementation of this design pattern in your application means that each object falls into one of these groups.
The communication between View to Model through Controller can be best described with the following diagram:
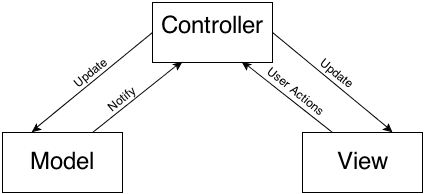
The Model notifies the Controller of any data changes, and in turn, the Controller updates the data in the Views. The View can then notify the Controller of actions the user performed and the Controller will either update the Model if necessary or retrieve any requested data.
You might be wondering why you can't just ditch the Controller, and implement the View and Model in the same class, as that seems a lot easier.
It all comes down to code separation and reusability. Ideally, the View should be completely separated from the Model. If the View doesn't rely on a specific implementation of the Model, then it can be reused with a different model to present some other data.
For example, if in the future you'd also like to add movies or books to your library, you could still use the same AlbumView to display your movie and book objects. Furthermore, if you want to create a new project that has something to do with albums, you could simply reuse your Album struct, because it's not dependent on any view. That's the strength of MVC!
How to Use the MVC Pattern
First, you need to ensure that each class in your project is either a Controller, a Model or a View; don't combine the functionality of two roles in one class.
Second, in order to ensure that you conform to this method of work you should create three project groups to hold your code, one for each category.
Navigate to File\New\Group (or press on Command+Option+N) and name the group Model. Repeat the same process to create View and Controller groups.
Now drag Album.swift to the Model group. Drag AlbumView.swift to the View group, and finally drag ViewController.swift to the Controller group.
At this point the project structure should look like this:

Your project already looks a lot better without all those files floating around. Obviously you can have other groups and classes, but the core of the application is contained in these three categories.
Now that your components are organized, you need to get the album data from somewhere. You'll create an API class to use throughout your code to manage the data — which presents an opportunity to discuss your next design pattern — the Singleton.
The Singleton Pattern
The Singleton design pattern ensures that only one instance exists for a given class and that there's a global access point to that instance. It usually uses lazy loading to create the single instance when it's needed the first time.
Note: Apple uses this approach a lot. For example: UserDefaults.standard, UIApplication.shared, UIScreen.main, FileManager.default all return a Singleton object.
You're likely wondering why you care if there's more than one instance of a class floating around. Code and memory is cheap, right?
There are some cases in which it makes sense to have exactly one instance of a class. For example, there's only one instance of your application and one main screen for the device, so you only want one instance of each. Or, take a global configuration handler class: it's easier to implement a thread-safe access to a single shared resource, such as a configuration file, than to have many class modifying the configuration file possibly at the same time.
What Should You Be Careful About?
Note from Ray: This pattern has a history of being overused (or otherwise misused) by both beginner and experienced developers, so we are including this brief excerpt from our book Design Patterns by Tutorials by Joshua Greene that explains some things to be careful about with this pattern.
The singleton pattern is very easy to overuse.
If you encounter a situation where you're tempted to use a singleton, first consider other ways to accomplish your task.
For example, singletons are not appropriate if you're simply trying to pass information from one view controller to another. Instead, consider passing models via an initializer or property.
If you determine you actually do need a singleton, consider whether a singleton plus makes more sense.
Will having more than one instance cause problems? Will it ever be useful to have custom instances? Your answers will determine whether its better for you to use a true singleton or singleton plus.
The most common reason why singleton's are problematic is testing. If you have state being stored in a global object like a singleton then order of tests can matter, and it can be painful to mock them. Both of these reasons make testing a pain.
Lastly, beware of "code smell", indicating your use case isn't appropriate as a singleton at all. For example, if you often need many custom instances, your use case may be better as a regular object.

How to Use the Singleton Pattern
To ensure there is only one instance of your singleton, you must make it impossible for anyone else to make an instance. Swift allows you to do this by marking the initializers as private. You can then add a static property for the shared instance, which is initialized inside the class.
You'll implement this pattern by creating a singleton class to manage all the album data.
You'll notice there's a group called API in the project; this is where you'll put all the classes that will provide services to your app. Create a new file inside this group by right-clicking the group and selecting New File. Select iOS > Swift File. Set the file name to LibraryAPI.swift and click Create.
Now go to LibraryAPI.swift and insert this code:
final class LibraryAPI { // 1 static let shared = LibraryAPI() // 2 private init() { } } Here's the breakdown:
- The
sharedstatic constant approach gives other objects access to the singleton objectLibraryAPI. - The private initializer prevents creating new instances of
LibraryAPIfrom outside.
You now have a Singleton object as the entry point to manage the albums. Take it a step further and create a class to handle the persistence of your library data.
Now within the group API create a new file. Select iOS > Swift File. Set the class name to PersistencyManager.swift and click Create.
Open PersistencyManager.swift and add the following code.
final class PersistencyManager { } Inside the curly braces put this snippet:
private var albums = [Album]() Here you declare a private property to hold album data. The array is mutable, so you can easily add and delete albums.
Now add the following initializer to the class:
init() { //Dummy list of albums let album1 = Album(title: "Best of Bowie", artist: "David Bowie", genre: "Pop", coverUrl: "https://s3.amazonaws.com/CoverProject/album/album_david_bowie_best_of_bowie.png", year: "1992") let album2 = Album(title: "It's My Life", artist: "No Doubt", genre: "Pop", coverUrl: "https://s3.amazonaws.com/CoverProject/album/album_no_doubt_its_my_life_bathwater.png", year: "2003") let album3 = Album(title: "Nothing Like The Sun", artist: "Sting", genre: "Pop", coverUrl: "https://s3.amazonaws.com/CoverProject/album/album_sting_nothing_like_the_sun.png", year: "1999") let album4 = Album(title: "Staring at the Sun", artist: "U2", genre: "Pop", coverUrl: "https://s3.amazonaws.com/CoverProject/album/album_u2_staring_at_the_sun.png", year: "2000") let album5 = Album(title: "American Pie", artist: "Madonna", genre: "Pop", coverUrl: "https://s3.amazonaws.com/CoverProject/album/album_madonna_american_pie.png", year: "2000") albums = [album1, album2, album3, album4, album5] } In the initializer, you're populating the array with five sample albums. If the above albums aren't to your liking, feel free to replace them with the music you enjoy. :]
Now add the following functions to the class:
func getAlbums() -> [Album] { return albums } func addAlbum(_ album: Album, at index: Int) { if (albums.count >= index) { albums.insert(album, at: index) } else { albums.append(album) } } func deleteAlbum(at index: Int) { albums.remove(at: index) } These methods allow you to get, add, and delete albums.
Build your project just to make sure everything still compiles correctly.
At this point, you might wonder where the PersistencyManager class comes in since it's not a Singleton. You'll see the relationship between LibraryAPI and PersistencyManager in the next section where you'll look at the Facade design pattern.
The Facade Design Pattern

The Facade design pattern provides a single interface to a complex subsystem. Instead of exposing the user to a set of classes and their APIs, you only expose one simple unified API.
The following image explains this concept:

The user of the API is completely unaware of the complexity that lies beneath. This pattern is ideal when working with a large number of classes, particularly when they are complicated to use or difficult to understand.
The Facade pattern decouples the code that uses the system from the interface and implementation of the classes you're hiding; it also reduces dependencies of outside code on the inner workings of your subsystem. This is also useful if the classes under the facade are likely to change, as the facade class can retain the same API while things change behind the scenes.
For example, if the day comes when you want to replace your backend service, you won't have to change the code that uses your API, just the code inside your Facade.
How to Use the Facade Pattern
Currently you have PersistencyManager to save the album data locally and HTTPClient to handle the remote communication. The other classes in your project should not be aware of this logic, as they will be hiding behind the facade of LibraryAPI.
To implement this pattern, only LibraryAPI should hold instances of PersistencyManager and HTTPClient. Then, LibraryAPI will expose a simple API to access those services.
The design looks like the following:

LibraryAPI will be exposed to other code, but will hide the HTTPClient and PersistencyManager complexity from the rest of the app.
Open LibraryAPI.swift and add the following constant properties to the class:
private let persistencyManager = PersistencyManager() private let httpClient = HTTPClient() private let isOnline = false isOnline determines if the server should be updated with any changes made to the albums list, such as added or deleted albums. The HTTP client doesn't actually work with a real server and is only here to demonstrate the usage of the facade pattern, so isOnline will always be false.
Next, add the following three methods to LibraryAPI.swift:
func getAlbums() -> [Album] { return persistencyManager.getAlbums() } func addAlbum(_ album: Album, at index: Int) { persistencyManager.addAlbum(album, at: index) if isOnline { httpClient.postRequest("/api/addAlbum", body: album.description) } } func deleteAlbum(at index: Int) { persistencyManager.deleteAlbum(at: index) if isOnline { httpClient.postRequest("/api/deleteAlbum", body: "\(index)") } } Take a look at addAlbum(_:at:). The class first updates the data locally, and then if there's an internet connection, it updates the remote server. This is the real strength of the Facade; when some class outside of your system adds a new album, it doesn't know — and doesn't need to know — of the complexity that lies underneath.
Note: When designing a Facade for classes in your subsystem, remember that unless you're building a separate module and are using access control, nothing prevents the client from accessing these "hidden" classes directly. Don't be stingy with defensive code and don't assume that all the clients will necessarily use your classes the same way the Facade uses them.
Build and run your app. You'll see two empty views, and a toolbar. The top view will be used to display your album covers, and the bottom view will be used to display a table of information related to that album.

You'll need something to display the album data on screen — which is a perfect use for your next design pattern: the Decorator.
The Decorator Design Pattern
The Decorator pattern dynamically adds behaviors and responsibilities to an object without modifying its code. It's an alternative to subclassing where you modify a class's behavior by wrapping it with another object.
In Swift there are two very common implementations of this pattern: Extensions and Delegation.
Extensions
Adding extensions is an extremely powerful mechanism that allows you to add new functionality to existing classes, structures or enumeration types without having to subclass. What's also really awesome is you can extend code you don't have access to, and enhance their functionality. That means you can add your own methods to Cocoa classes such as UIView and UIImage!
Swift extensions are slightly different from the classic definition of a decorator, because a extension doesn't hold an instance of the class it extends.
How to Use Extensions
Imagine a situation in which you have an Album instance that you want to present inside a table view:

Where will the album titles come from? Album is a Model, so it doesn't care how you present the data. You'll need some external code to add this functionality to the Album struct.
You'll create a extension of the Album struct; it will define a new method that returns a data structure which can be used easily with UITableView.
Go to Album.swift and add the following code at the end of the file:
typealias AlbumData = (title: String, value: String) This typealias defines a tuple which contains all of the information that the table view needs to display a row of data. Now add the following extension to access this information:
extension Album { var tableRepresentation: [AlbumData] { return [ ("Artist", artist), ("Album", title), ("Genre", genre), ("Year", year) ] } } An array of AlbumData will be much easier to display in a table view!
Note: Classes can of course override a superclass's method, but with extensions you can't. Methods or properties in an extension cannot have the same name as methods or properties in the original class.
Consider for a moment how powerful this pattern can be:
- You're using properties directly from
Album. - You have added to the
Albumstruct but you haven't modified it. - This simple addition lets you return a
UITableView–ish representation of anAlbum.
Delegation
The other implementation of the Decorator design pattern, Delegation, is a mechanism in which one object acts on behalf of, or in coordination with, another object. UITableView is greedy – it has two delegate-type properties, one called a data source, and one called a delegate. They do slightly different things – for example, the table view asks its data source how many rows should be in a particular section, but it asks its delegate what to do when a row is selected.
You can't expect the UITableView to know how many rows you want to have in each section, as this is application-specific. Therefore, the task of calculating the amount of rows in each section is passed on to the data source. This allows the UITableView class to be independent of the data it displays.
Here's a pseudo-explanation of what goes on when you create a new UITableView:
Table: Here I am! All I want to do is SHOW CELLS. Hey, how many sections do I have?
Data source: One!
Table: OK, nice and easy! And how many cells in that first section?
Data source: Four!
Table: Thanks! Now, bear with me, this might get a bit repetitive. Can I have the cell at section 0, row 0?
Data source: Here you go!
Table: And now section 0, row 1?
…and so on.
The UITableView object does its job of displaying a table view. However, eventually it will need some information that it doesn't have. Then, it turns to its delegate and data source and sends a message asking for additional information.
It might seem easier to just subclass an object and override the necessary methods, but consider that you can only subclass based on a single class. If you want an object to be the delegate of two or more other objects, you won't be able to achieve this by subclassing.
Note: This is an important pattern. Apple uses this approach in most of the UIKit classes: UITableView, UITextView, UITextField, UIWebView, UICollectionView, UIPickerView, UIGestureRecognizer, UIScrollView. The list goes on and on.
How to Use the Delegate Pattern
Open up ViewController.swift and add these private properties to the class:
private var currentAlbumIndex = 0 private var currentAlbumData: [AlbumData]? private var allAlbums = [Album]() Starting from Swift 4, variables marked as private can share the same access control scope between a type and any extension on said type. If you want to browse the new features introduced by Swift 4, take a look to What's New in Swift 4?.
You're going to make ViewController the table view's data source. Add this extension to the end of ViewController.swift, after the closing brace of the class definition:
extension ViewController: UITableViewDataSource { } The compiler will warn you because UITableViewDataSource has a few mandatory functions. Add the following code inside the extension to make it happy:
func tableView(_ tableView: UITableView, numberOfRowsInSection section: Int) -> Int { guard let albumData = currentAlbumData else { return 0 } return albumData.count } func tableView(_ tableView: UITableView, cellForRowAt indexPath: IndexPath) -> UITableViewCell { let cell = tableView.dequeueReusableCell(withIdentifier: "Cell", for: indexPath) if let albumData = currentAlbumData { let row = indexPath.row cell.textLabel!.text = albumData[row].title cell.detailTextLabel!.text = albumData[row].value } return cell } tableView(_:numberOfRowsInSection:) returns the number of rows to display in the table view, which matches the number of items in the "decorated" representation of the album.
tableView(_:cellForRowAtIndexPath:) creates and returns a cell with the title and its value.
Note: You can actually add the methods to the main class declaration or to the extension; the compiler doesn't care that the data source methods are actually inside the UITableViewDataSource extension. For humans reading the code though, this kind of organization really helps with readability.
Next, replace viewDidLoad() with this code:
override func viewDidLoad() { super.viewDidLoad() //1 allAlbums = LibraryAPI.shared.getAlbums() //2 tableView.dataSource = self } Here's a breakdown of the above code:
- Get a list of all the albums via the API. Remember, the plan is to use the facade of
LibraryAPIrather thanPersistencyManagerdirectly! - This is where you setup the
UITableView. You declare that the view controller is theUITableViewdata source; therefore, all the information required byUITableViewwill be provided by the view controller. Note that you can actually set the delegate and datasource in a storyboard, if your table view is created there.
Now, add the following method to the ViewController class:
private func showDataForAlbum(at index: Int) { // defensive code: make sure the requested index is lower than the amount of albums if (index < allAlbums.count && index > -1) { // fetch the album let album = allAlbums[index] // save the albums data to present it later in the tableview currentAlbumData = album.tableRepresentation } else { currentAlbumData = nil } // we have the data we need, let's refresh our tableview tableView.reloadData() } showDataForAlbum(at:) fetches the required album data from the array of albums. When you want to present the new data, you just need to call reloadData on the UITableView. This causes the table view to ask its data source such things as how many sections should appear in the table view, how many rows in each section, and how each cell should look, etc.
Add the following line to the end of viewDidLoad()
showDataForAlbum(at: currentAlbumIndex) This loads the current album at app launch. And since currentAlbumIndex is set to 0, this shows the first album in the collection.
Build and run your project. Your app should start and present you with the following screen:

Table view data source success!
Final Touches
In order to not pollute your code with hardcoded values, like the string Cell, go to ViewController and, just after the opening brace of the class definition, add the following:
private enum Constants { static let CellIdentifier = "Cell" } Here you are creating an enumeration that acts as a container for your constants.
Note: The advantage of using a case-less enumeration is that it can't accidentally be instantiated and works as a pure namespace.
Now just replace "Cell" with Constants.CellIdentifier.
Where to go from here?
Things are looking pretty good so far! You have the MVC pattern in place, and you've also seen the singleton, facade, and decorator patterns in action. You can see how these are used within Cocoa by Apple, and also how to apply the patterns to your own code.
Here is the final project for this part if you want to have a look or compare.
There's a lot more in store: there are still the adapter, observer, and memento patterns to cover in part two of this tutorial. And if that's not enough, we have a follow-up tutorial coming up covering even more design patterns as you work on refactoring a simple iOS game.
If you have questions or just want to talk about your favorite design patterns, join in on the forum discussion below!
raywenderlich.com Weekly
The raywenderlich.com newsletter is the easiest way to stay up-to-date on everything you need to know as a mobile developer.
Get a weekly digest of our tutorials and courses, and receive a free in-depth email course as a bonus!
What Design Patterns Are Commonly Used In Ios Apps
Source: https://www.raywenderlich.com/477-design-patterns-on-ios-using-swift-part-1-2
Posted by: goodwinengifiricent.blogspot.com
0 Response to "What Design Patterns Are Commonly Used In Ios Apps"
Post a Comment